Posts

Showing posts from December, 2017

Schematic of car backseat tray

Image
To operate automatic system driving circuit is needed . first of all arrange following parts . Four relays . Two push buttons one click button DC supply  schematics of car tray system connect All parts as shown in above diagram. Connect motor while table is fully opened and switch two is pressed . shown under the top in 3d view of car tray table and second from top to bottom in schematic. Connect n/c pin of relay 2 to positive and n/c pin of relay 3 to negative. Connect n/o pin of rely 2 to negative and n/o pin of relay 3 to positive. Output from common pins of both relays is connected to dc geared motor. Above connections will reverse the polarity of both output when click switch is operated and in return reverse the direction of rotation of motor. when click switch is opened both outputs to the dc motor are from n/c pins of relays. motor will rotate until switch 3 is pushed down and relay 4 is operated making n/o pin positive which will operate relay 3....
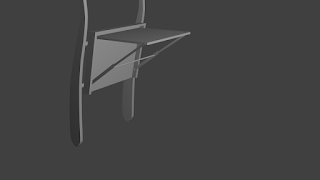

Car Backseat Automatic Table

Image
Before reading about automatic tray table refer to previous posts about how to install manual car backseat tray table  . to install automatic operating system first install a rod across strips like in image rod for rotation Next step is selection of motor here we are using dc motor with gears to reduce speed and increase torque of motor . For installation of motor make a square like hole in the base of car tray table such that half motor fits inside that space or such that motor do not touch the top of table when fully closed. Now attach motor to the base by drilling holes in the slot and then rotate a metal or plastic strip around motor and insert pins between metal strips and base so that motor can rotate . Then attach a rod with threads to the shaft of motor . Its time to insert  connect motor and system. to do so take a metal square of size just to fit two rods inside at each side drill two holes like one at left to right at the top edge of side and the ...

Car backseat tray table mechanical assembly

Image
To use these pictures first read previous post and refer below pictures to assemble car seat table. car seat frame once you open leather cover of seat you will find this kind of metal strips or metal rods . you will add two rods or one sheet to give tray system mechanical support as given below mechanical support for base Attach two rods as in above diagram. you can use metal strips or a metal sheet between frame to provide mechanical support to base of car seat tray base of car back seat table Next step is to attach base. To do this drill four holes in previously attached rods making a square . reapply leather cover and drill four holes in the base of car tray base both should in front of each other joints of car seat tray table Then drill small holes keeping in mind that upper two should outwards from center and lower two should inwards and then insert four small cylinders which will act as joints(axis of rotation) for top of table tray system inserti...

Car backseat table

Having your lunch or a light meal while you are travelling is a trouble for every one. Some of luxurious cars are now including tables for passengers on backseats. One approach to have this facility is to design your own using simple steps and parts 1st of all you need to make table top for which you can use kitchen cutting board as table top or you can machine your own . Modify it upto your requirements like cup holding place etc Next you have to plan attachement to the seats. It depends on the type of seats you have. Here i can write some of possibillities like if car seats have cloth on back then you have to open cover and attach rods horizontally to the frame of seat and if seats came with plastic on back then system's base could be attached with screws directly. base will also provide mechanichal support. Next step is to dicide about working of system. Some of options are Manual. Single table operating with button. Centralized system controlled by one keypad or remote...